
接⼝对象封装的思想及实现
发布: 更新时间:2022-08-28 22:45:42
解决的问题
- 代码冗余度⾼(有⼤量重复代码)
- 代码耦合度⾼
- 代码维护成本⾼
核⼼思想:代码分层
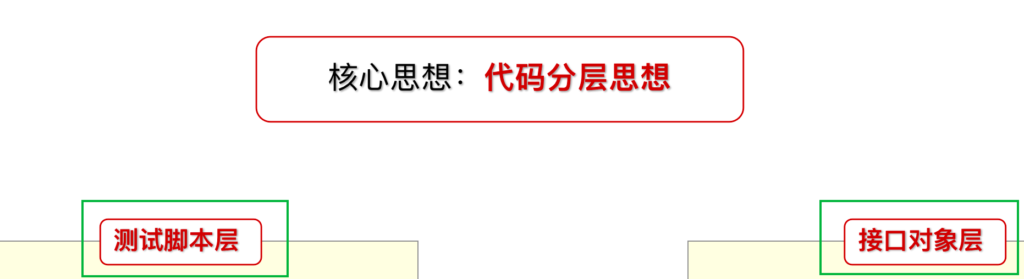
- 分层思想:
- 将 普通⽅法实现的 ,分为 接⼝对象层 和 测试脚本层。
- 接⼝对象层:
- 对 接⼝ 进⾏封装。封装好之后,给 测试⽤例层 调⽤!
- ⾯向对象 类 封装 实现。
- 测试⽤例层:
- 调⽤ 接⼝对象层 封装的⽅法,拿到 响应结果,断⾔进⾏接⼝测试!
- 借助 unittest 框架实现
案例
Tpshop商城登录接口测试
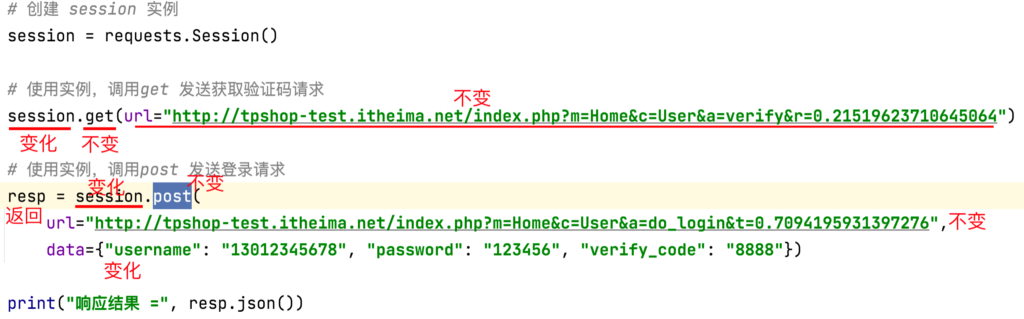
1.普通⽅式实现
import unittest
import requests


class TestTpshopLogin(unittest.TestCase):
    # 测试 登录成功
    def test01_login_ok(self):
        # 创建 session 实例
        session = requests.Session()

        # 使用实例,调用get 发送获取验证码请求
        session.get(url="http://tpshop-test.itheima.net/index.php?m=Home&c=User&a=verify&r=0.21519623710645064")

        # 使用实例,调用post 发送登录请求
        resp = session.post(
            url="http://tpshop-test.itheima.net/index.php?m=Home&c=User&a=do_login&t=0.7094195931397276",
            data={"username": "13012345678", "password": "123456", "verify_code": "8888"})

        print("响应结果 =", resp.json())

        # 断言:
        self.assertEqual(200, resp.status_code)
        self.assertEqual(1, resp.json().get("status"))
        self.assertEqual("登陆成功", resp.json().get("msg"))

    # 测试 手机号不存在
    def test02_tel_not_exists(self):
        # 创建 session 实例
        session = requests.Session()

        # 使用实例,调用get 发送获取验证码请求
        session.get(url="http://tpshop-test.itheima.net/index.php?m=Home&c=User&a=verify&r=0.21519623710645064")

        # 使用实例,调用post 发送登录请求
        resp = session.post(
            url="http://tpshop-test.itheima.net/index.php?m=Home&c=User&a=do_login&t=0.7094195931397276",
            data={"username": "13847834701", "password": "123456", "verify_code": "8888"})


        print("响应结果 =", resp.json())

        # 断言:
        self.assertEqual(200, resp.status_code)
        self.assertEqual(-1, resp.json().get("status"))
        self.assertEqual("账号不存在!", resp.json().get("msg"))

    # 测试 密码错误
    def test03_pwd_err(self):
        # 创建 session 实例
        session = requests.Session()

        # 使用实例,调用get 发送获取验证码请求
        session.get(url="http://tpshop-test.itheima.net/index.php?m=Home&c=User&a=verify&r=0.21519623710645064")

        # 使用实例,调用post 发送登录请求
        resp = session.post(
            url="http://tpshop-test.itheima.net/index.php?m=Home&c=User&a=do_login&t=0.7094195931397276",
            data={"username": "13012345678", "password": "123456890", "verify_code": "8888"})

        print("响应结果 =", resp.json())

        # 断言:
        self.assertEqual(200, resp.status_code)
        self.assertEqual(-2, resp.json().get("status"))
        self.assertEqual("密码错误!", resp.json().get("msg"))
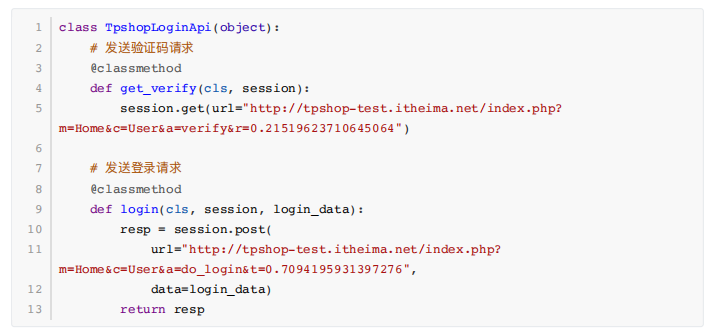
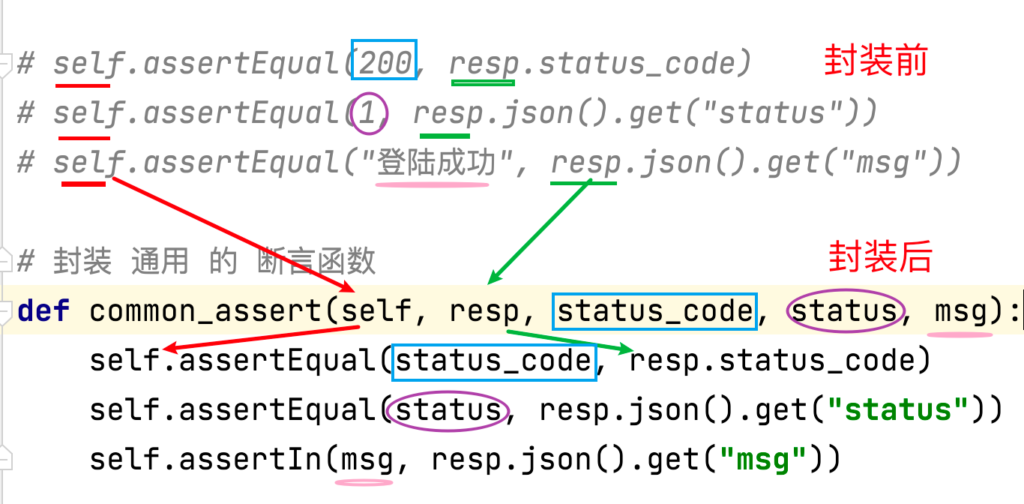
2.登录接⼝封装
封装思想:
- 将动态变化的数据,设计到⽅法的参数。
- 将固定不变的,直接写成⽅法实现。
- 将响应结果,通过返回值传出。
分析:
封装实现:
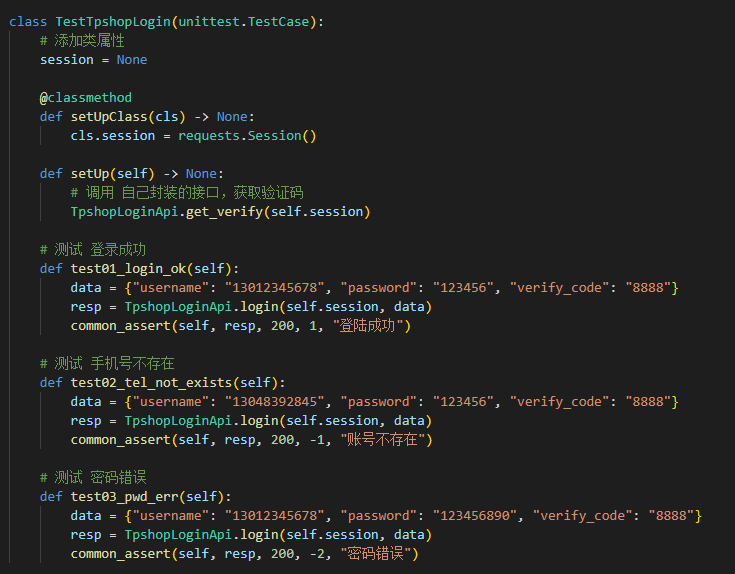
3.登录测试⽤例封装(断言)
登录接口优化后:
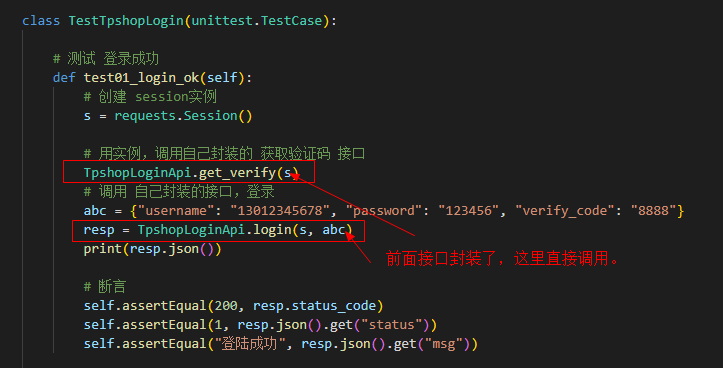
可以看到:对于断言,也有很多重复的,同时这里的测试数据abc也可以使用数据代码分离的方式,写到专门的json文件中去。
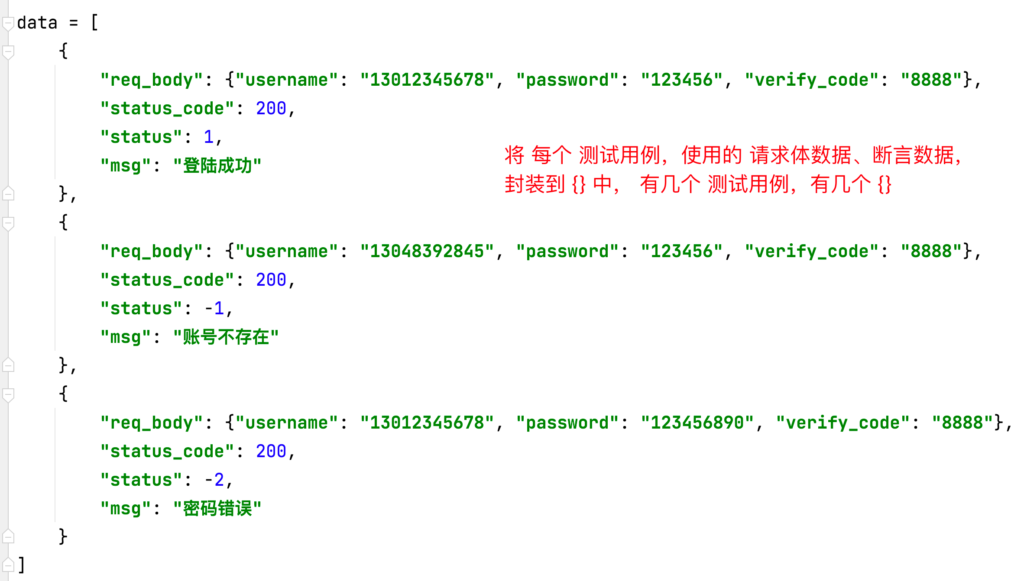
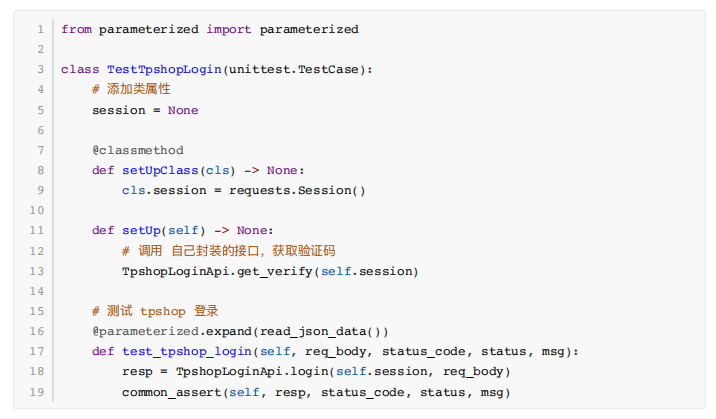
4.参数化
经过接口封装、和断言封装后。代码如下:
可以看出:三个测试用例,结构都是相同的,只是传入的参数不同。因此可以考虑使用参数化
提取每个测试⽤例 使⽤的 测试数据 和 断⾔数据。
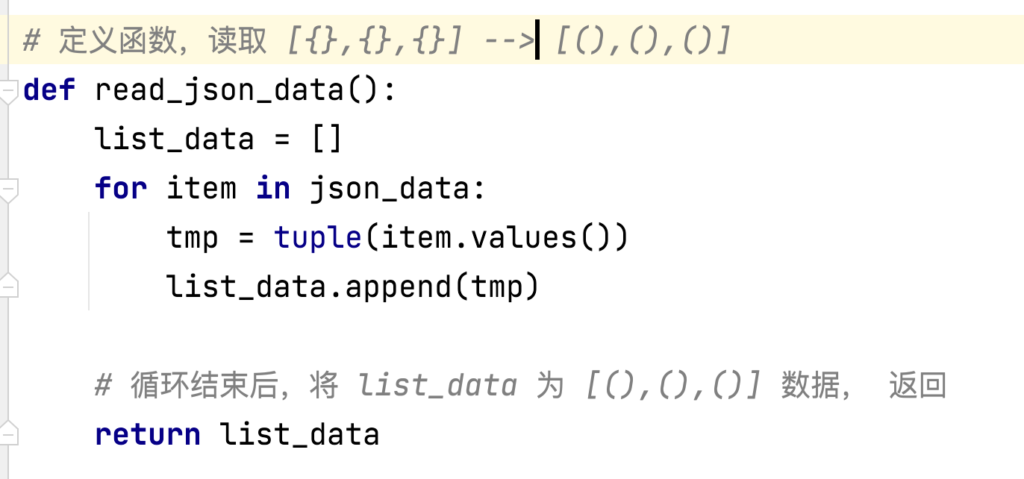
封装函数,将 数据 转换为 元组列表。
5.最终优化的代码:
文章排行
-
1
原神3.8心海武器推荐 原神3.8心海带什么武器
-
2
阴阳师寻迹骰怎么获得 阴阳师寻迹骰获得方法
-
3
王者荣耀妄想都市观光怎么获得 王者荣耀妄想都市观光活动
-
4
阴阳师新召唤屋和幕间皮肤效果怎么样 阴阳师新召唤屋和幕间皮肤获取方法介绍
-
5
羊了个羊7.26攻略 羊了个羊7月26日怎么过
-
6
崩坏星穹铁道求不得成就攻略介绍 崩坏星穹铁道求不得成就怎么获得
-
7
崩坏星穹铁道去吧阿刃成就攻略介绍 崩坏星穹铁道去吧阿刃成就怎么获得
-
8
时空中的绘旅人罗夏生日有什么复刻 绘旅人罗夏生日礼包复刻一览
-
9
银河境界线武器强度怎么看 银河境界线武器强度排行攻略
-
10
阴阳师红蛋蛋限时福利怎么获得 阴阳师再结前缘版本福利介绍


