
python多线程超级详细!
发布: 更新时间:2022-10-14 14:30:28
一、什么是多线程?
多线程类似于同时执行多个不同程序,多线程运行有如下优点:
- 使用线程可以把占据长时间的程序中的任务放到后台去处理。
- 用户界面可以更加吸引人,比如用户点击了一个按钮去触发某些事件的处理,可以弹出一个进度条来显示处理的进度。
- 程序的运行速度可能加快。
- 在一些等待的任务实现上如用户输入、文件读写和网络收发数据等,线程就比较有用了。在这种情况下我们可以释放一些珍贵的资源如内存占用等等。
二、线程与进程的区别
- 线程共享内存,进程独立内存
- 线程启动速度块,进程启动速度慢,运行时速度没有可比性
- 同一个进程的线程间可以直接交流,两个进程想通信,必须通过一个中间代理来实现
- 创建新线程很简单,创建新进程需要对其父进程进行一次克隆
- 一个线程可以控制和操作同一线程里的其他线程,但是进程只能操作子进程
三、threading模块
方式一:直接使用
import threading
import time

def run(name):
    print(name,"线程执行了!")
    time.sleep(5)

#创建2个线程对象
t1=threading.Thread(target=run,args=("t1",))
t2=threading.Thread(target=run,args=("t2",))

#启动线程
t1.start()
t2.start()

#等待子线程执行完毕后再执行主线程后面的内容
t1.join()
t2.join()

print("执行完毕")
方式二:继承式调用
import threading
import time

class myThread(threading.Thread): #继承threading.Thread类

    def __init__(self,name):
        threading.Thread.__init__(self)  #继承初始化方法
        self.name = name

    def run(self): #重写父类run()方法
        print(f"开始线程{self.name}")
        print("线程执行中---1")
        time.sleep(1)
        print("线程执行中---2")
        time.sleep(1)
        print("线程执行中---3")
        print(f"结束线程{self.name}")

#创建线程,实例化线程对象
t1=myThread("t1")
t2=myThread("t2")
t3=myThread("t3")

#开启线程
t1.start()
t2.start()
t3.start()

#等待子线程执行完毕后再执行主线程后面的内容
t1.join()
t2.join()
t3.join()

print("执行完毕")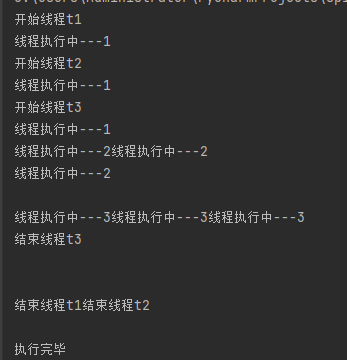
四、守护线程与join方法
- 在Python多线程编程中,join方法的作用式线程同步。
- 守护线程,是为守护别人而存在的,当设置为守护线程后,被守护的主线程不存在后,守护线程也自然不存在。
第一种:python多线程默认情况
Python多线程默认情况(设置线程setDaemon(False)),主线程执行完自己的任务后,就退出了,此时子线程会继续执行自己的任务,直到子线程任务结束
代码演示:threading中的两个创建多线成的例子(
第二种:开启守护线程
开启线程的setDaemon(True),设置子线程为守护线程,实现主程序结束,子程序立马全部结束功能
代码演示:
# 守护线程
import threading
import time


class MyThreading(threading.Thread):
    def __init__(self, name):
        super(MyThreading, self).__init__()
        self.name = name

    # 线程要运行的代码
    def run(self):
        print("我是线程%s" % self.name)
        time.sleep(2)
        print("线程%s运行结束" % self.name)


t1 = MyThreading(1)
t2 = MyThreading(2)
start_time = time.time()
t1.setDaemon(True)
t1.start()
t2.setDaemon(True)
t2.start()
end_time = time.time()
print("两个线程一共的运行时间为:", end_time-start_time)
print("主线程结束")
守护线程
注意:如果要设置为守护线程,一定要在开启线程之前,将该线程设置为守护线程
结论:主线程结束后,无论子线程1,2是否运行完成,都结束线程,不在继续向下运行
第三种:加入join()方法设置同步
当不给程序设置守护进程时,主程序将一直等待子程序全部运行完成才结束
代码演示:threading中的两个创建多线成的例子都是。所有子线程执行完后才执行主线程
五、线程锁(互斥锁Mutex)
一个进程下可以启用多个线程,多个线程共享父进程的内存空间,也就意味着每个线程可以访问同一份数据,此时如果多个线程同时要修改一份数据,会出现什么状况?
# -*- coding:utf8  -*-
import threading
import time

num = 100
threading_list = []


def fun():
    global num
    print("get num:", num)
    num += 1
    time.sleep(1)


for x in range(200):
    t = threading.Thread(target=fun)
    t.start()
    threading_list.append(t)

for x in threading_list:
    x.join()

print("nun:", num)
结论:运行结果可能会出现num<300的情况
正常来讲,这个num结果应该是300, 但在python 2.7上多运行几次,会发现,最后打印出来的num结果不总是300,为什么每次运行的结果不一样呢? 哈,很简单,假设你有A,B两个线程,此时都 要对num 进行加1操作, 由于2个线程是并发同时运行的,所以2个线程很有可能同时拿走了num=100这个初始变量交给cpu去运算,当A线程去处完的结果是101,但此时B线程运算完的结果也是101,两个线程同时CPU运算的结果再赋值给num变量后,结果就都是101。那怎么办呢? 很简单,每个线程在要修改公共数据时,为了避免自己在还没改完的时候别人也来修改此数据,可以给这个数据加一把锁, 这样其它线程想修改此数据时就必须等待你修改完毕并把锁释放掉后才能再访问此数据。
*注:不要在3.x上运行,不知为什么,3.x上的结果总是正确的,可能是自动加了锁
加锁操作步骤:
# 实例化锁对象
lock = threading.Lock()
lock.acquire() # 加锁
'''需要加锁的代码内容'''
lock.release() # 释放锁import random
import threading
import time
num = 100
threading_list = []
def fun():
global num
time.sleep(random.random())
lock.acquire() # 加锁
print("get num:", num, threading.current_thread())
num += 1
lock.release() # 释放锁
# 实例化锁对象
lock = threading.Lock()
for x in range(200):
t = threading.Thread(target=fun)
t.start()
threading_list.append(t)
for x in threading_list:
x.join()
print("num:", num)机智的同学可能会问到这个问题,就是既然你之前说过了,Python已经有一个GIL来保证同一时间只能有一个线程来执行了,为什么这里还需要lock? 注意啦,这里的lock是用户级的lock,跟那个GIL没关系 ,具体我们通过下图来看一下+配合我现场讲给大家,就明白了。
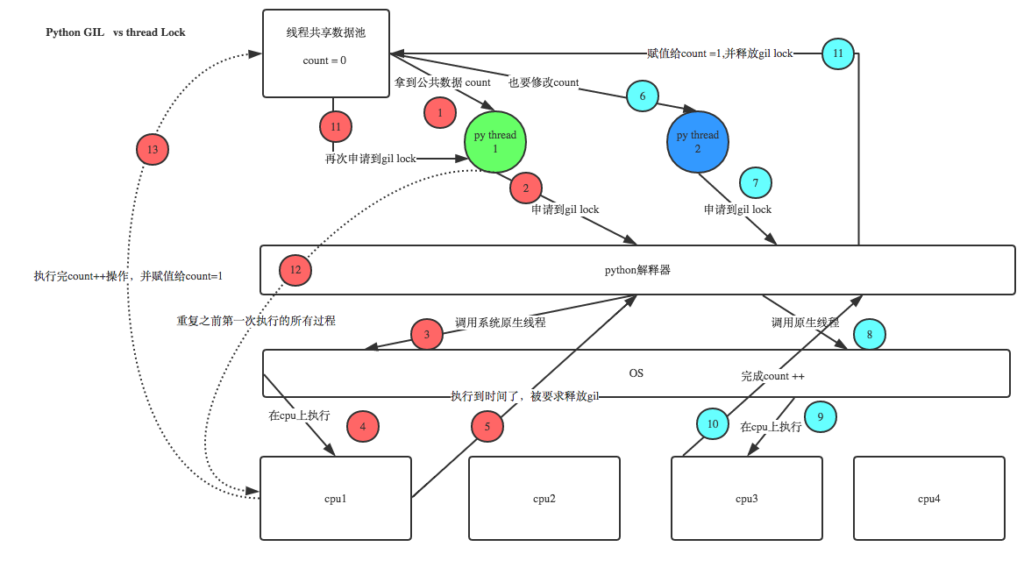
那你又问了, 既然用户程序已经自己有锁了,那为什么C python还需要GIL呢?加入GIL主要的原因是为了降低程序的开发的复杂度,比如现在的你写python不需要关心内存回收的问题,因为Python解释器帮你自动定期进行内存回收,你可以理解为python解释器里有一个独立的线程,每过一段时间它起wake up做一次全局轮询看看哪些内存数据是可以被清空的,此时你自己的程序 里的线程和 py解释器自己的线程是并发运行的,假设你的线程删除了一个变量,py解释器的垃圾回收线程在清空这个变量的过程中的clearing时刻,可能一个其它线程正好又重新给这个还没来及得清空的内存空间赋值了,结果就有可能新赋值的数据被删除了,为了解决类似的问题,python解释器简单粗暴的加了锁,即当一个线程运行时,其它人都不能动,这样就解决了上述的问题, 这可以说是Python早期版本的遗留问题。
六、RLock(递归锁)
说白了就是在一个大锁中还要再包含子锁
import threading, time


def run1():
    lock.acquire()
    print("grab the first part data")
    global num
    num += 1
    lock.release()
    return num


def run2():
    lock.acquire()
    print("grab the second part data")
    global num2
    num2 += 1
    lock.release()
    return num2


def run3():
    lock.acquire()
    res = run1()
    print('--------between run1 and run2-----')
    res2 = run2()
    lock.release()
    print(res, res2)


if __name__ == '__main__':
    num, num2 = 0, 0
    lock = threading.RLock()
    for i in range(3):
        t = threading.Thread(target=run3)
        t.start()

while threading.active_count() != 1:
    print(threading.active_count())
else:
    print('----all threads done---')
    print(num, num2)
在开发的过程中要注意有些操作默认都是 线程安全的(内部集成了锁的机制),我们在使用的时无需再通过锁再处理,例如:
import threading

data_list = []

lock_object = threading.RLock()


def task():
    print("开始")
    for i in range(1000000):
        data_list.append(i)
    print(len(data_list))


for i in range(2):
    t = threading.Thread(target=task)
    t.start()
七、Semaphore(信号量)
互斥锁同时只允许一个线程修改数据,而Semaphore是同时允许一定数量的线程修改数据,比如厕所有三个坑,那最多只允许三个人上厕所,后面的人只能等前面的人出来才能进去。
信号量操作步骤:
semaphore = threading.BoundedSemaphore(5)
semaphore.acquire()
'''允许5个线程同时操作这块代码'''
semaphore.release()# -*- coding:GBK -*-
import threading
import time
sum_1 = 0
def run(i):
global sum_1
time.sleep(1)
# lock.acquire()
semaphore.acquire()
sum_1 += 1
print("线程%s来了,并修改了sum_1的值为:%s" % (i, sum_1))
semaphore.release()
# lock.release()
# lock = threading.Lock()
semaphore = threading.BoundedSemaphore(5)
for x in range(10):
t = threading.Thread(target=run, args=(x,))
t.start()
while threading.active_count() != 1:
pass
print("程序结束")八、Event(事件)
通过Event来实现两个或多个线程间的交互,下面是一个红绿灯的例子,即起动一个线程做交通指挥灯,生成几个线程做车辆,车辆行驶按红灯停,绿灯行的规则。
四个常用方法:
- set() # 设置标志位为 True
- clear() # 清空标志位(将标志位改为false)
- is_set() # 检测标志位,如果标志位被设置,返回True,否则返回False
- wait() # 等待标志位被设置为True程序才继续往下运行
import threading
import time

def light():
    count = 1
    event.set()  # 设置标志位 True
    while True:
        if count <= 10:
            print("现在是绿灯")
            time.sleep(1)
        elif count <= 15:
            print("现在是红灯")
            event.clear()   # 清空标志位(将标志位改为false)
            time.sleep(1)
        else:
            count = 0
            event.set()
        count += 1


def car(name):
    while True:
        if event.is_set():
            print("----------%s在起飞-------------" % name)
            time.sleep(1)
        else:
            print("---------%s在等红灯---------------" % name)
            event.wait()   # 等待标志位被设置位True程序才继续往下运行


event = threading.Event()
light_1 = threading.Thread(target=light)
light_1.start()
for x in range(5):
    car_1 = threading.Thread(target=car, args=("马自达"+str(x),))
car_1.start()九、Queue(队列)
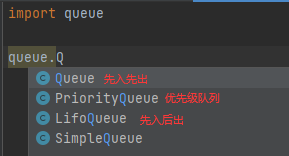
Python 的 Queue 模块中提供了同步的、线程安全的队列类,包括FIFO(先入先出)队列Queue,LIFO(后入先出)队列LifoQueue,和优先级队列 PriorityQueue。
这些队列都实现了锁原语,能够在多线程中直接使用,可以使用队列来实现线程间的同步。
Queue 模块中的常用方法:

import queue
import threading
import time

exitFlag = 0

class myThread (threading.Thread):
    def __init__(self, threadID, name, q):
        threading.Thread.__init__(self)
        self.threadID = threadID
        self.name = name
        self.q = q
    def run(self):
        print ("开启线程:" + self.name)
        process_data(self.name, self.q)
        print ("退出线程:" + self.name)

def process_data(threadName, q):
    while not exitFlag:
        queueLock.acquire()
        if not workQueue.empty():
            data = q.get()
            queueLock.release()
            print ("%s processing %s" % (threadName, data))
        else:
            queueLock.release()
        time.sleep(1)

threadList = ["Thread-1", "Thread-2", "Thread-3"]
nameList = ["One", "Two", "Three", "Four", "Five"]
queueLock = threading.Lock()
workQueue = queue.Queue(10)
threads = []
threadID = 1

# 创建新线程
for tName in threadList:
    thread = myThread(threadID, tName, workQueue)
    thread.start()
    threads.append(thread)
    threadID += 1

# 填充队列
queueLock.acquire()
for word in nameList:
    workQueue.put(word)
queueLock.release()

# 等待队列清空
while not workQueue.empty():
    pass

# 通知线程是时候退出
exitFlag = 1

# 等待所有线程完成
for t in threads:
    t.join()
print ("退出主线程")
以上程序执行结果:
开启线程:Thread-1
开启线程:Thread-2
开启线程:Thread-3
Thread-3 processing One
Thread-1 processing Two
Thread-2 processing Three
Thread-3 processing Four
Thread-1 processing Five
退出线程:Thread-3
退出线程:Thread-2
退出线程:Thread-1
退出主线程
十、生产者消费者模型
在并发编程中使用生产者和消费者模式能够解决绝大多数并发问题。该模式通过平衡生产线程和消费线程的工作能力来提高程序的整体处理数据的速度。
为什么要使用生产者和消费者模式
在线程世界里,生产者就是生产数据的线程,消费者就是消费数据的线程。在多线程开发当中,如果生产者处理速度很快,而消费者处理速度很慢,那么生产者就必须等待消费者处理完,才能继续生产数据。同样的道理,如果消费者的处理能力大于生产者,那么消费者就必须等待生产者。为了解决这个问题于是引入了生产者和消费者模式。
什么是生产者消费者模式
生产者消费者模式是通过一个容器来解决生产者和消费者的强耦合问题。生产者和消费者彼此之间不直接通讯,而通过阻塞队列来进行通讯,所以生产者生产完数据之后不用等待消费者处理,直接扔给阻塞队列,消费者不找生产者要数据,而是直接从阻塞队列里取,阻塞队列就相当于一个缓冲区,平衡了生产者和消费者的处理能力。
# 生产者/消费者
import threading
import queue
import time


# 生产者
def producer(name):
    count = 1
    while True:
        p.put("{}骨头{}".format(name, count))
        print("骨头{}被{}生产".format(count, name).center(60, "*"))
        count += 1
        time.sleep(0.1)


# 消费者
def consumer(name):
    while True:
        print("{}被{}吃掉了".format(p.get(), name))


# 实例化队列对象
p = queue.Queue(10)
# 创建生产者线程
producer_threading1 = threading.Thread(target=producer, args=("飞某人",))
producer_threading2 = threading.Thread(target=producer, args=("Alex",))
# 创建消费者线程
consumer_threading1 = threading.Thread(target=consumer, args=("张三",))
consumer_threading2 = threading.Thread(target=consumer, args=("李四",))
producer_threading1.start()
producer_threading2.start()
consumer_threading1.start()
consumer_threading2.start()
十一、线程池
Python3中官方才正式提供线程池。
线程不是开的越多越好,开的多了可能会导致系统的性能更低了,例如:如下的代码是不推荐在项目开发中编写。
import threading

def task(video_url):
    pass

url_list = ["www.xxxx-{}.com".format(i) for i in range(30000)]

for url in url_list:
    t = threading.Thread(target=task, args=(url,))
    t.start()
# 这种每次都创建一个线程去操作,创建任务的太多,线程就会特别多,可能效率反倒降低了。建议:使用线程池
import time
from concurrent.futures import ThreadPoolExecutor  # 并行期货,线程池执行者
"""
pool = ThreadPoolExecutor(100)
pool.submit(函数名,参数1,参数2,参数...)
"""

def task(video_url, num):
    print("开始执行任务", video_url, num)     # 开始执行任务 www.xxxx-299.com 3
    time.sleep(1)

# 创建线程池,最多维护10个线程
threadpool = ThreadPoolExecutor(10)
# 生成300网址,并放入列表
url_list = ["www.xxxx-{}.com".format(i) for i in range(300)]
for url in url_list:
    """
    在线程池中提交一个任务,线程池如果有空闲线程,则分配一个线程去执行,执行完毕后在将线程交还给线程池,
    如果没有空闲线程,则等待。注意在等待时,与主线程无关,主线程依然在继续执行。
    """
    threadpool.submit(task, url, 3)

print("等待线程池中的任务执行完毕中······")
threadpool.shutdown(True)   # 等待线程池中的任务执行完毕后,在继续执行
print("END")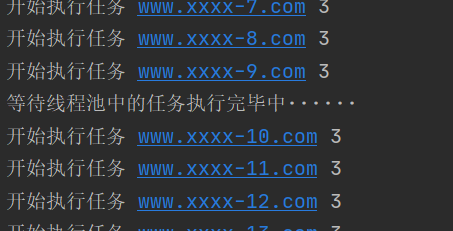

任务执行完任务,再干点其他事:
"""线程池的回调"""
import time
import random
from concurrent.futures import ThreadPoolExecutor

def task(video_url):
    print("开始执行任务", video_url)
    time.sleep(1)
    return random.randint(0, 10)    # 将结果封装成一个Futuer对象,返回给线程池

def done(response):     # response就是futuer对象,也就是task的返回值分装的一个Futuer对象
    print("任务执行完后,回调的函数", response.result())    # 即Futuer.result():取出task的返回值

# 创建线程池
threadpool = ThreadPoolExecutor(10)
url_list = ["www.xxxx-{}.com".format(i) for i in range(5)]
for url in url_list:
    futuer = threadpool.submit(task, url)    # futuer是由task返回的一个Future对象,里面有记录task的返回值
    futuer.add_done_callback(done)           # 回调done函数,执行者依然是子线程

# 优点:可以做分工,例如:task专门下载,done专门将下载的数据写入本地文件。-
1
原神3.8心海武器推荐 原神3.8心海带什么武器
-
2
阴阳师寻迹骰怎么获得 阴阳师寻迹骰获得方法
-
3
王者荣耀妄想都市观光怎么获得 王者荣耀妄想都市观光活动
-
4
阴阳师新召唤屋和幕间皮肤效果怎么样 阴阳师新召唤屋和幕间皮肤获取方法介绍
-
5
羊了个羊7.26攻略 羊了个羊7月26日怎么过
-
6
崩坏星穹铁道求不得成就攻略介绍 崩坏星穹铁道求不得成就怎么获得
-
7
崩坏星穹铁道去吧阿刃成就攻略介绍 崩坏星穹铁道去吧阿刃成就怎么获得
-
8
时空中的绘旅人罗夏生日有什么复刻 绘旅人罗夏生日礼包复刻一览
-
9
银河境界线武器强度怎么看 银河境界线武器强度排行攻略
-
10
阴阳师红蛋蛋限时福利怎么获得 阴阳师再结前缘版本福利介绍


